前言
在开发中遇到各种各样的界面问题,都dialog 界面,单一的dialog 根本解决不了。 代码维护量还挺大,代码还不好去阅读。所以自己去了解了一下dialog 的使用,就去模仿了一下, 最后知道了,这个东西就是设计模式。原来自己对设计模式,还是很陌生的,写的相对还是很少。
经典的dialog 的写法,是这样的:
final AlertDialog.Builder normalDialog =
            new AlertDialog.Builder(MainActivity.this);
        normalDialog.setIcon(R.drawable.icon_dialog);
        normalDialog.setTitle("我是一个普通Dialog")
        normalDialog.setMessage("你要点击哪一个按钮呢?");
        normalDialog.setPositiveButton("确定",
            new DialogInterface.OnClickListener() {
            @Override
            public void onClick(DialogInterface dialog, int which) {
                //...To-do
            }
        });
        normalDialog.setNegativeButton("关闭",
            new DialogInterface.OnClickListener() {
            @Override
            public void onClick(DialogInterface dialog, int which) {
                //...To-do
            }
        });
        // 显示
        normalDialog.show()
简单写法
    new AlertDialog.Builder(MainActivity.this)
        .setIcon(R.drawable.icon_dialog)
        .setTitle("我是一个普通Dialog")
        .setMessage("你要点击哪一个按钮呢?")
        .setPositiveButton("确定",
            new DialogInterface.OnClickListener() {
            @Override
            public void onClick(DialogInterface dialog, int which) {
                //...To-do
            }
        })
        .setNegativeButton("关闭",
            new DialogInterface.OnClickListener() {
            @Override
            public void onClick(DialogInterface dialog, int which) {
                //...To-do
            }
        })
        .show()
从而看到 直接新建Builder 就可以了。后面直接加载就可以了。 直接从源码入手,
 public static class Builder {
    ```
 }
然后继续进入所有的变量的信息都是从builder 去获取,继而对builder的 方法中都会回去改方法。
最简单的使用
public class Person {
  private String name;
  private int age;
  private double height;
  private double weight;
  public String getName() {
    return name;
  }
  public void setName(String name) {
    this.name = name;
  }
  public int getAge() {
    return age;
  }
  public void setAge(int age) {
    this.age = age;
  }
  public double getHeight() {
    return height;
  }
  public void setHeight(double height) {
    this.height = height;
  }
  public double getWeight() {
    return weight;
  }
  public void setWeight(double weight) {
    this.weight = weight;
  }
}
然后我们为了方便可能会定义一个构造方法。
public Person(String name, int age, double height, double weight) {
        this.name = name;
        this.age = age;
        this.height = height;
        this.weight = weight;
    }
或许为了方便new对象,你还会定义一个空的构造方法:
public Person() {
    }
甚至有时候你很懒,只想传部分参数,你还会定义如下类似的构造方法。
public Person(String name) {
  this.name = name;
}
public Person(String name, int age) {
  this.name = name;
  this.age = age;
}
public Person(String name, int age, double height) {
  this.name = name;
  this.age = age;
  this.height = height;
}
于是你就可以这样创建各个需要的对象
Person p1=new Person();
Person p2=new Person("张三");
Person p3=new Person("李四",18);
Person p4=new Person("王五",21,180);
Person p5=new Person("赵六",17,170,65.4);
修改后的代码
我们给Person增加一个静态内部类Builder类,并修改Person类的构造函数,代码如下。
public class Person {
  private String name;
  private int age;
  private double height;
  private double weight;
  privatePerson(Builder builder){
    this.name=builder.name;
    this.age=builder.age;
    this.height=builder.height;
    this.weight=builder.weight;
  }
public String getName(){
    return name;
  }
public void setName(String name){
    this.name = name;
}
public int getAge(){
    return age;
  }
public void setAge(int age){
    this.age = age;
  }
public double getHeight(){
    return height;
  }
public void setHeight(double height){
    this.height = height;
  }
public double getWeight() {
    return weight;
  }
public void setWeight(double weight){
    this.weight = weight;
  }

static class Builder{
    private String name;
    private int age;
    private double height;
    private double weight;
    public Builder name(String name){
      this.name=name;
      return this;
    }
    public Builder age(int age){
      this.age=age;
      return this;
    }
    public Builder height(double height){
      this.height=height;
      return this;
    }
    public Builder weight(double weight){
      this.weight=weight;
      return this;
    }
    public Person build(){
      return new Person(this);
    }
  }
}
从上面的代码中我们可以看到,我们在Builder类里定义了一份与Person类一模一样的变量,通过一系列的成员函数进行设置属性值,但是返回值都是this,也就是都是Builder对象,最后提供了一个build函数用于创建Person对象,返回的是Person对象,对应的构造函数在Person类中进行定义,也就是构造函数的入参是Builder对象,然后依次对自己的成员变量进行赋值,对应的值都是Builder对象中的值。此外Builder类中的成员函数返回Builder对象自身的另一个作用就是让它支持链式调用,使代码可读性大大增强。
于是我们就可以这样创建Person类。
Person.Builder builder=new Person.Builder();
Person person=builder
  .name("张三")
  .age(18)
  .height(178.5)
  .weight(67.4)
  .build();
有没有觉得创建过程一下子就变得那么清晰了。对应的值是什么属性一目了然,可读性大大增强。
dialog 自己的写
public class DialogLogin extends Dialog implements View.OnClickListener {


    protected final Builder builder;
    private TextView tvtrue;

    public DialogLogin(Context context, Builder builder) {
        super(context);
        this.builder = builder;
    }

    public DialogLogin(Builder builder) {
        super(builder.context, 0);
        this.builder = builder;
    }

    @Override
    protected void onCreate(Bundle savedInstanceState) {
        super.onCreate(savedInstanceState);
        requestWindowFeature(Window.FEATURE_NO_TITLE);
        setContentView(R.layout.dialog_login);
        this.tvtrue = (TextView) findViewById(R.id.tv_true);
        this.tvtrue.setOnClickListener(this);
    }

    @Override
    public void onClick(View view) {
        switch (view.getId()) {
            case R.id.tv_true:
                if (builder.onYesCallback != null) {
                    builder.onYesCallback.onYesClick();
                    dismiss();
                }
                break;
        }
    }

    public static class Builder {
        protected final Context context;
        protected onYesOnclickListener onYesCallback;
        protected onNoOnclickListener onNoCallback;

        public Builder(@NonNull Context context) {
            this.context = context;
        }

        public DialogLogin.Builder onYesPositive(@NonNull onYesOnclickListener callback) {
            this.onYesCallback = callback;
            return this;
        }

        public DialogLogin.Builder onNoNegative(@NonNull onNoOnclickListener callback) {
            this.onNoCallback = callback;
            return this;
        }

        @UiThread
        public DialogLogin build() {
            return new DialogLogin(this);
        }

        @UiThread
        public DialogLogin show() {
            DialogLogin dialog = build();
            dialog.show();
            return dialog;
        }
    }

    public interface onYesOnclickListener {
        public void onYesClick();
    }

    public interface onNoOnclickListener {
        public void onNoClick();
    }

}
自己写判断是否在其他地方登陆界面 使用
 new DialogLogin.Builder(XuanzheActivity.this).onYesPositive(new DialogLogin.onYesOnclickListener() {
                        @Override
                        public void onYesClick() {
                            startActivity(new Intent(XuanzheActivity.this, LoginActivity.class));
                            finish();
                        }
                    }).show();
就提示已dialog,然后自定义layout 既可以了。 这个是未了特定特殊要求的界面客户。 还用在图片加载上
Glide.with(context).load("http://i.imgur.com/DvpvklR.png").into(imageView);

Picasso.with(context).load("http://i.imgur.com/DvpvklR.png").into(imageView); 是不是很神奇。 **关于Builder的一点说明**
线程安全问题
由于Builder是非线程安全的,所以如果要在Builder内部类中检查一个参数的合法性,必需要在对象创建完成之后再检查。
public User build() {
  User user = new user(this);
  if (user.getAge() > 120) {
    throw new IllegalStateException(“Age out of range”); // 线程安全
  }
  return user;
}
上面的写法是正确的,而下面的代码是非线程安全的:
public User build() {
  if (age > 120) {
    throw new IllegalStateException(“Age out of range”); // 非线程安全
  }
  return new User(this);
}
经典的Builder模式
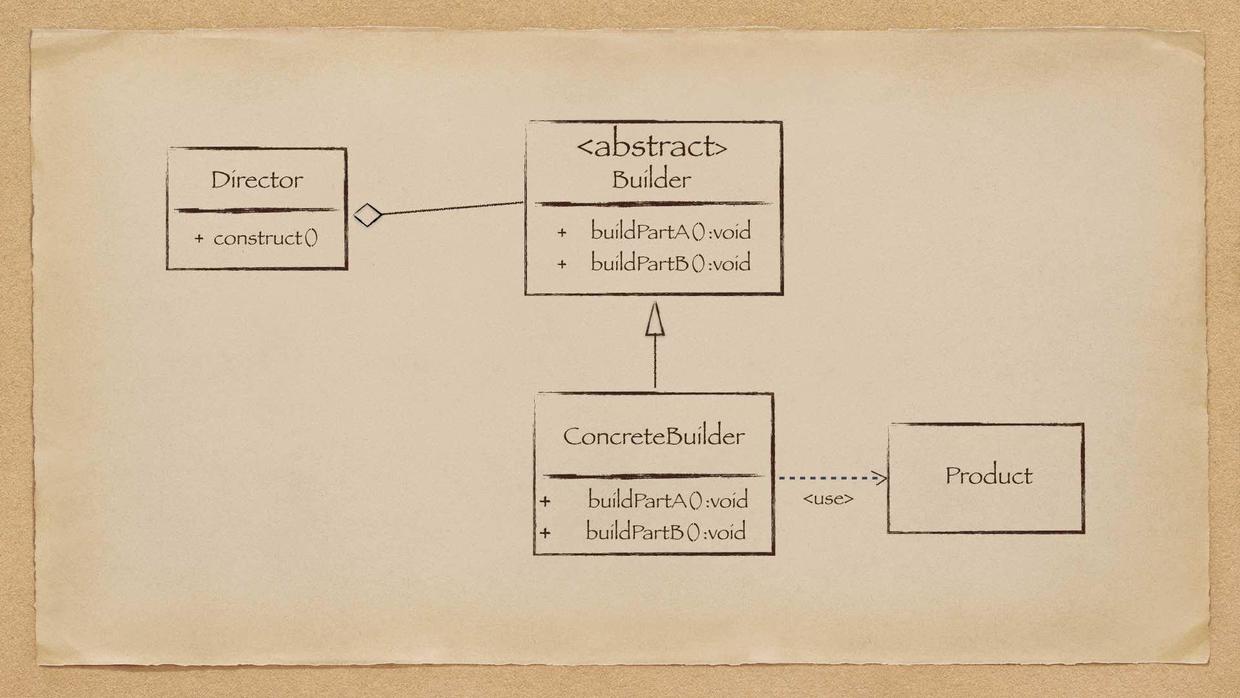
上面介绍的Builder模式当然不是“原生态”的啦,经典的Builder模式的类图如下:
 其中:
其中:
Product 产品抽象类。
Builder 抽象的Builder类。
ConcretBuilder 具体的Builder类。
Director 同一组装过程。
当然,之前实例中的Builder模式,是省略掉了Director的,这样结构更加简单。所以在很多框架源码中,涉及到Builder模式时,大多都不是经典GOF的Builder模式,而是省略后的。
其他高级应用 http://www.cnblogs.com/lwbqqyumidi/p/3742562.html